Monday, August 5, 2013

Aliens & Voodoo Dolls: a Mold and Resin tutorial

 "The Halloween Crafting Season has Begun"

 It has been a month since my last post and, besides enjoying the last few weeks of summer vacation with trips to the Bay Area, I have been busy building up my skills in molding and casting objects in preparation of the Halloween crafting season!! I do love Christmas, but am a little obsessed with Halloween - with the history, folklore and superstitions that surround this holiday, it is a free-reign field day for my imagination to run wild and challenge myself to try new mediums and create props and decor on a much larger scale.

 I decided to share one of my projects and the details for those that are starting out with molding and casting as I am...I have fallen in love with the process and have gone a little crazy since this project in that each project is larger then the next as I get a little more comfortable with the process.....


Mold Putty & Resin:


Here we go:


...in case it is hard to read, here is a list of ingredients:

* Mold Making Putty (see pic below)

* Epozy Resin Mix

*Mold Release Conditioner

* Items to be molded

* Wax paper to save your countertop

* A popsicle stick

* 2-3 clear plastic cups


The brand of mold putty I used - purchased at Michaels


On we go:

                        To make your mold from the item you have chosen: 


**Begin mixing together, you have 2 mins tops to mix and apply to the mold before the compound begins to set.


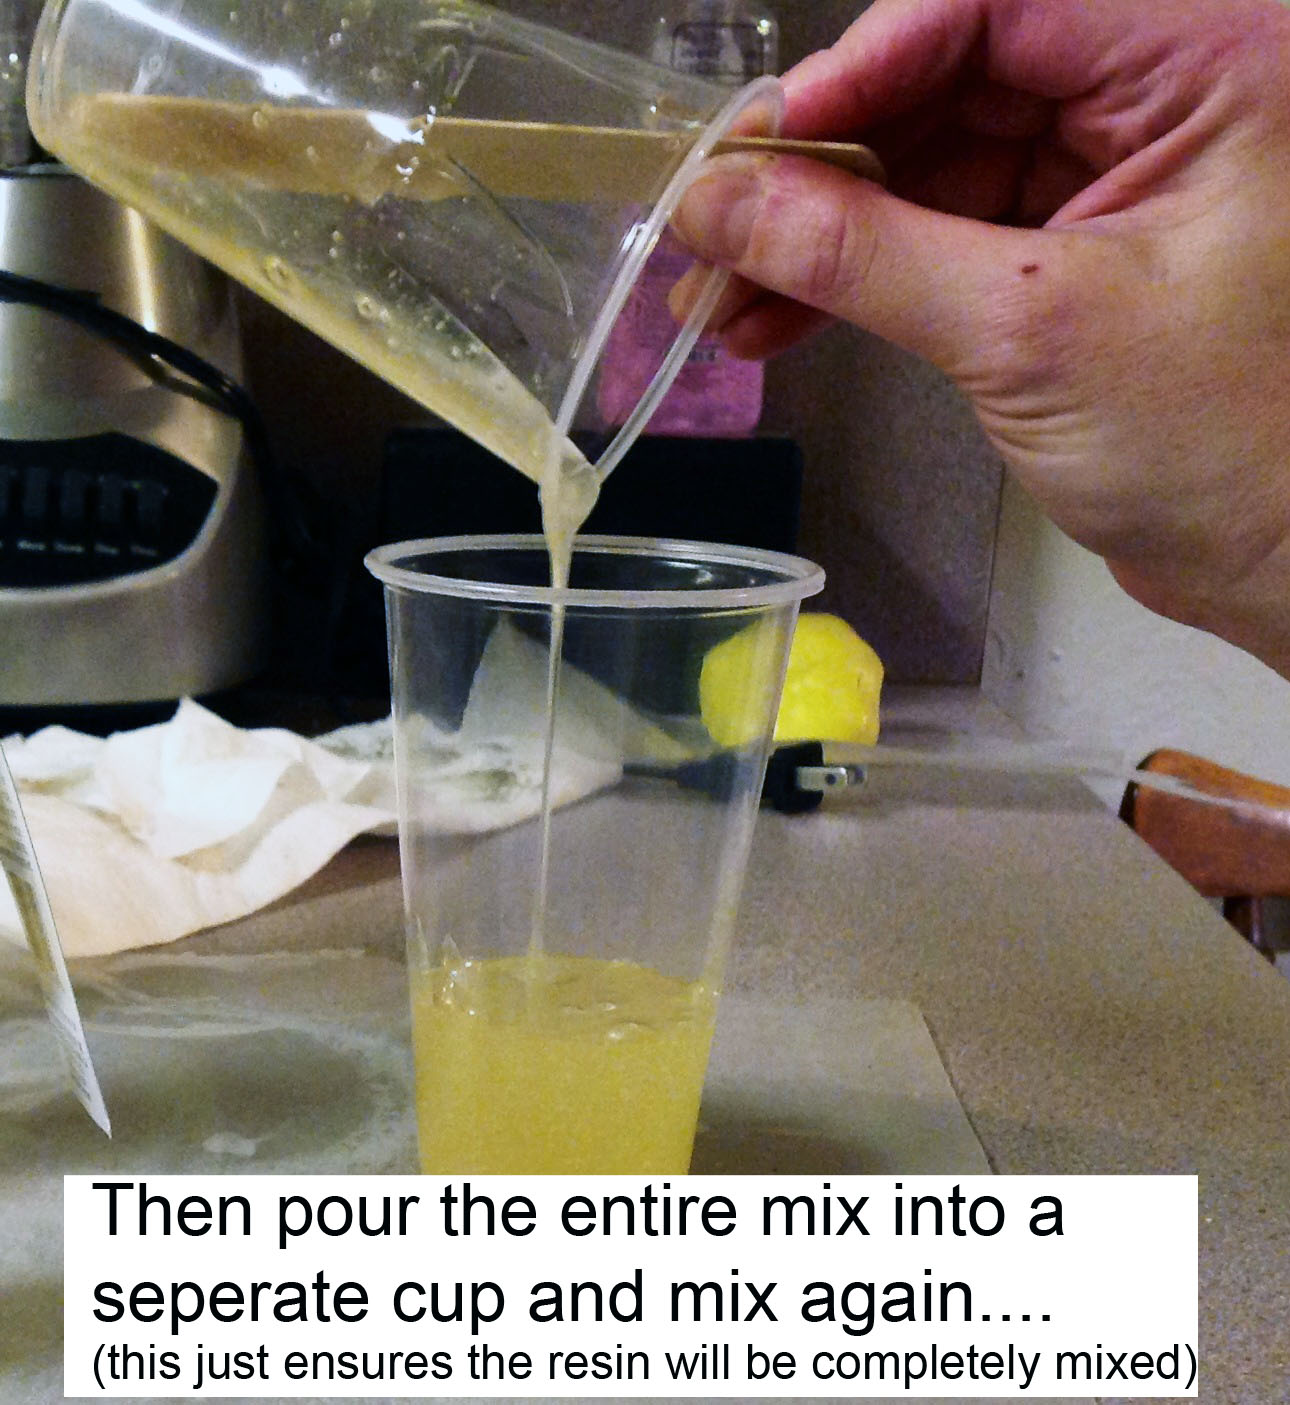
Now for our resin casting:

                ** Don't forget to apply release to your mold **

   FYI:

 Some molds may not necessarily need a mold release, but I always use the spray release anyway to be on the safe side - after losing a cast or two that would not come out of the mold, I decided I would play it safe from then on!


Forgive the misspell: corrected "Disappear" :)


These and many other Magnets, Keychains and Necklaces will be available in my Etsy Shop shortly!!

Thanks for checking out this tutorial. If you have any questions or comments, just enter them below and I'll get right back to you!!

Till Next Time,

      Wicked jypsi


Sunday, June 30, 2013

DIY Bead Loom - SUPER EASY!!


                 " DIY Bead Loom "


 At the moment, I am not flush with cash, so I have been scouring the web to find a loom making tute or idea so I can make my own with out going into major construction mode - and lo and behold, I found this:

Suzi Crafts Bead Loom Instructions:

                   http://suziscrafts.com/seed-bead-loom/


And then I made this:

It was so easy to make and required very few, inexpensive items from the hardware store.....

* a piece of wood that was 1" thick and cut to 6" x 14"

* 2 Pieces of wood each 1" thick and cut to 2" or 3" x 6" (same width as first board)

* 4 fairly large eye screws

* two  6" bolts (make sure they fit through the eye screws as shown)

* 2 screw-on nuts ( are there any other kind?? haha - j/k )

* 4 washers 

* 2 small nails

* Drill and drill bit a little smaller then the size of your eye screws

**********************************************************

To Begin:

You want to take your cut wood pieces and apply wood glue to small pieces before placing them on wither end of the large wood piece (as shown)....

Then drill two holes into each small wood piece (and into the bottom large piece) directly in the middle of the 3" x 6" pieces and about 1" in from the sides...and evenly spaced between each other and directly even across the large board to the 3" x 6" wood piece on the other end, so that the eye screws are even on both ends....  

(a little confusing I know, but the pic should end any confusion...if not, comment below with any questions and I'll get right back to you or you can also check out the tutorial on the link to "Suzi Craft"s above)

One end with the 3" x 6" glued to the large bottom piece and drilled to allow the eye screws to be screwed in...and repeat on the other end making sure the 4 eye screws are placed evenly across from each other on both ends.

Once you've screwed in the eye screws ( it helps to have someone hold the boards together while you twist in the eye screw to avoid the boards separating as the eye screw goes deeper) and let the glue dry a bit, then hammer in one of the two nails into each end (as shown below):

and gather your Bolts, Nuts and washers to thread through the eye screws.......

Place the washer on both ends of each bolt to help the bolt stay steady when threaded.

That's It ! 

Now you can paint it if you choose, I am just a a bright color- freak so painting mine was a must! But you could also add some stain to the wood if you prefer the natural- wood look too!!


Till Next time,

        Wicked jypsi


Sunday, June 23, 2013

Alcohol Inked Tile Coasters

Another awesome idea from Pinterest:

                         Alcohol Ink Tile Coasters


Father's Day was coming up fast and after seeing this pin, I decided I had to try it out...


From Pinterest, it was hard to track down a really thorough  tutorial from the original pin, so here is a mini-tute with some info that will make your project turn out fast and beautiful !!


FYI:  It's important to make sure you get the non-porous tiles - shiny top layer- believe it or not, I bought a stack of porous coaster that, after adding the ink, did not turn out right at all....so learn from my mistakes:)

Here are all the "ingredients" for this project:


* Square white tiles
* Rubbing Alcohol
* Ranger Alcohol Inks in different colors of choice
* Mod Podge
* Black Felt
* Black paint
* Clear Glaze or sealer of choice
* Paintbrushes and wax paper or something to work on to protect you counter space so it doesn't get all blotched with ink like mine did :)

First, using your paintbrush, coat your tile piece generously with rubbing alcohol:


 Then begin to add droplets of different colors onto the tile - don't add too much at first and the color will spread a bit on it's own to mix together:


Set the tile to dry for a while, but keep an eye out for white spots creeping into the design - You may need to add a bit more ink into those areas to get the whole tile covered. (This was a little frustrating for a bit as the ink would just spread to reveal white spots over and over again - put persistence is key...just keep dropping tiny drops of color where needed....)


After a few hours of being left to dry, your tiles should be ready to carefully paint the sides with the black paint to give the tiles a cleaner look (then having faded colors leaked down the sides)....

 
Once the black paint is dry...it's time to add the Mod Podge glue to the back of the tile with another paintbrush.....


Now, position your pre-cut felt piece over the back and press down to move the felt and secure it into the grooves on the back of the tile.....Let them dry for another few hours....


Finally, add a sealer of your choice to preserve the beautiful patterns your inks have become......


And, there you are.....

Voila !!


These coasters were a big hit on Father's Day ! Luckily I have plenty of supplies to make more to give as birthday gifts....

Feel free to comment if you have any questions about this process and I will get right back to you :))

Till next time,
    Wicked jypsi

Wednesday, June 12, 2013

Tin Can Organizer -I LOVE IT !!

                     "Tin Can Organizer"


       After see this project on Pinterest

            I had to give it a try...........

Here is how I did it:


I gathered the following (as shown):

Empty Paint can
6 different sized tin cans
12 each: bolts, washers, nuts (2 for each can)
1 large nail
Hammer
Drill
Sharpie (for marking where to drill holes)
Drill bits:  1 smaller and 1 the same size or a little larger then the size of my bolt

First, I marked where I wanted my holes to be on the tin cans:


 Next, using my nail and hammer, I punctured holes in the tin can where I had marked for holes:

Then, using the smaller bit, I enlarged each hole with my drill just enough to get my larger bit to fit inside and create a hole that fits the bolt:

 
I chose to paint all the cans and bucket different colors instead of decorating with paper, but whichever fits your own style definitely works:


When everything was dry, I marked the bucket to match the holes I had marked on the tin cans, and then punctured and drilled:

Everything was now ready to attach, so I placed the bolt inside the tin can pointing outward and pushed it through the bucket hole, and after adding my washer, I screwed in the nut to securely attach the tin can to the bucket  - and continued to add all the bolts/ washers/ nuts to each can until all of the cans were attached!!


                                              Viola !!!


Thanks for checking this out !! I've been working on lots of jewelry and hair accessories for the shop, so I'll be back with pictures really soon :)

Till Next time,

       Wicked jypsi


Wednesday, May 8, 2013

Duct Tape Creations by Lily

I am so proud to feature my daughter, Lily on this post - she is starting her own blog soon and I wanted to show off some of her creations...

 She has become quite the little Duct Tape artist since she discovered all the various styles and colors that are now available. 

Here is some backpack and wallets she has made recently:


One of her favorite sites to visit and learn new
techniques is "Sophies World"...it's a must to check out if you are interested in making anything with duct tape...it's quite amazing and COLORFUL!!!

Thanks for stopping by and I'll be back with more later this week and, of course, I will announce Lily's Craft blog as soon as it's up and ready!!

Till next time, 
   Wicked jypsi

Thursday, April 11, 2013

Homemade Outdoor Game Mats: Hopscotch & Checkers & a Picnic Blanket in a bag....

Since the weather here has been so beautiful (after the rain left), spending our time outdoors has become even more fun with this portable  
                                    Picnic Blanket and
                          Homemade Game Mats to master our  
                                    Checkers and Hopscotch 
                                               skills in the sunshine!!


HOPSCOTCH:

Each number is about a foot wide and long to allow plenty of room to land on the square...  

                                        
                                                        CHECKERS:

Any type of item can work as the Checker Pieces as long as they can be separated into two sets..(one set for each player).

Choose a theme and try to find it in a fabric pattern. Cut and iron on your fusible webbing to create your squares onto a plain background for the perfect Checker Board !!

REMEMBER: 

 Any item can work as checker pieces...Legos, colored dice, bottle              caps...anything that is in your junk drawer will work!


And Last.....

                                 Picnic Blanket in a Bag:

I found this Alice in Wonderland fabric and had to find a place to show it off and this bag seemed perfect since a picnic can double as a Tea Party as well...right??

Using some of our favorite tee shirts we no longer can wear (but didn't want to throw out) we cut and sewed them together, added some batting and attached it all to a waterproof fabric for a backing...just in case the ground is till a little wet from the rain :))

Ready for a Picnic Party!!

 Thanks for checking in and I'll be back in a few days with new Summertime Jewelry items to die for :))))


Till next time,

         Wicked jypsi