Thursday, December 12, 2013

Christmas Advent Project !!

Its Time for Advent......


I wanted something original to do the advent with my daughter this year, and was intrigued by the chalk board paint option so I found a way to add it in to my project. 

Each day we mark the date on the chalk board part of the plaque with the chalk, and then read a part of the original Christmas story from a book she has had since she was very little. "The First Christmas" by Carol Heyer has beautiful illustrations and has been a special part of each year's advent celebration in our house. 

Anyway, after reading, we either clip a treat onto the clip on the plaque or clip a piece of paper with a clue to where the treat can be hunted down somewhere in the house!  

Here's a quick tute on how I put our Advent plaque together:


* Ingredients:

* A wood plaque or board

* Paint brushes (large and small)

* Red, white and green paint

* Chalk Board paint (paint-on, not spray)

* Hemp & Eye screws to hang up

* a Clip of your choosing ( I used one from the 7 gypsies collection)

* E6000 glue (or whichever glue is strong  of your choosing)

* Hemp twine - any color

* Holly leaves and berries (I made mine from green paper and red felt)


Paint your background and leave a small circle blank around your chalk board circle if you want to paint a wreath around it...


I painted a second coat of white over my letters just so they looked better and used a stencil brush to dab the green wreath with a lighter green paint to look more like a "leafy" wreath....

Then paint the bows whichever color you choose and (after all has dried) use the E6000 glue to attach the clip you have chosen to the bottom of the plaque.


After that has dried, probably overnight, just to be safe, use a spray or paint on sealer to finish it all off........

To Hang: 

I attached two eye screws to the top of the plaque (spaced evenly apart) and then braided some green hemp twine and tied the ends to the eye screws to make sure all was secure when I hung the plaque on the wall...


Congrats, you're done!!!

Enjoy your Homemade Advent and I'll be back with more Christmas projects real soon!!

Saturday, December 7, 2013

Christmas Crafting & Decor with Thrift finds!


I have been hard at work on projects to give as gifts and to share on this blog...but on a recent trip to the thrift store (where I find a lot of my supplies :) I was thrilled to find a few things that I was actually "Looking For" vs. whatever I happen to find ..you understand!

The absolute best was the Cookoo Clock...

I have a small but growing collection going and even though this one is not a real "vintage" model, it still is going to be great to have and use as a Christmas Decoration!


 Then I found this skirt hanging on the Halloween Costume rack....


 ......it was marked way down and I had to grab it purely for the fabric. I can use it in so many ways and it was a really long skirt so there was plenty to work with!!

But this Santa was so cute and had such a vintage look to it, that I had to pick it up. It winds up on the bottom and plays "Santa Claus is Comin' to Town"...


...who could pass that up !!


Thanks for checking in, and I'll be back with more projects!!


Wicked jypsi


Saturday, November 16, 2013

It's Christmas Time: Easy Colored Block Lights !

           "Colored - Block Nightlights"

I saw a post on Crab & Fish ( I believe it was a link from a Pinterest pic that led me to her site.....) but these Festive Glass Block Nightlights were so pretty it was hard to imagine how easy they would be to put together....really simple...like 1,2 Done! 

Just a KraftyBlok from a craft store and some white (or green) wire lights in any colors or size you want! Her name is Mari and she has a cute little tutorial on them on her site..so check it out!

.......................


And last, a quick update (because I am sooo late with this) but Halloween was fantastic and we ended up with a last minute costume change and a need for a quick but cute "Red Riding Hood" cape and Fleece Fun.com came to the rescue with a simple but easy and adorable downloadable pattern and instructions. It was easy enough for me to sew the entire cape start to finish in 2 hours on Halloween afternoon...whew!


Here's what we ended up with:


A Happy "Little Red" on Halloween !


                             Hope your Halloween was wonderful as well!!


Now...onto Christmas!!!

Till next time,

     Wicked jypsi

Saturday, October 26, 2013

Halloween Door Knocker Tutorial.....

                    Halloween Door Knocker: 

                                  ** Tutorial **

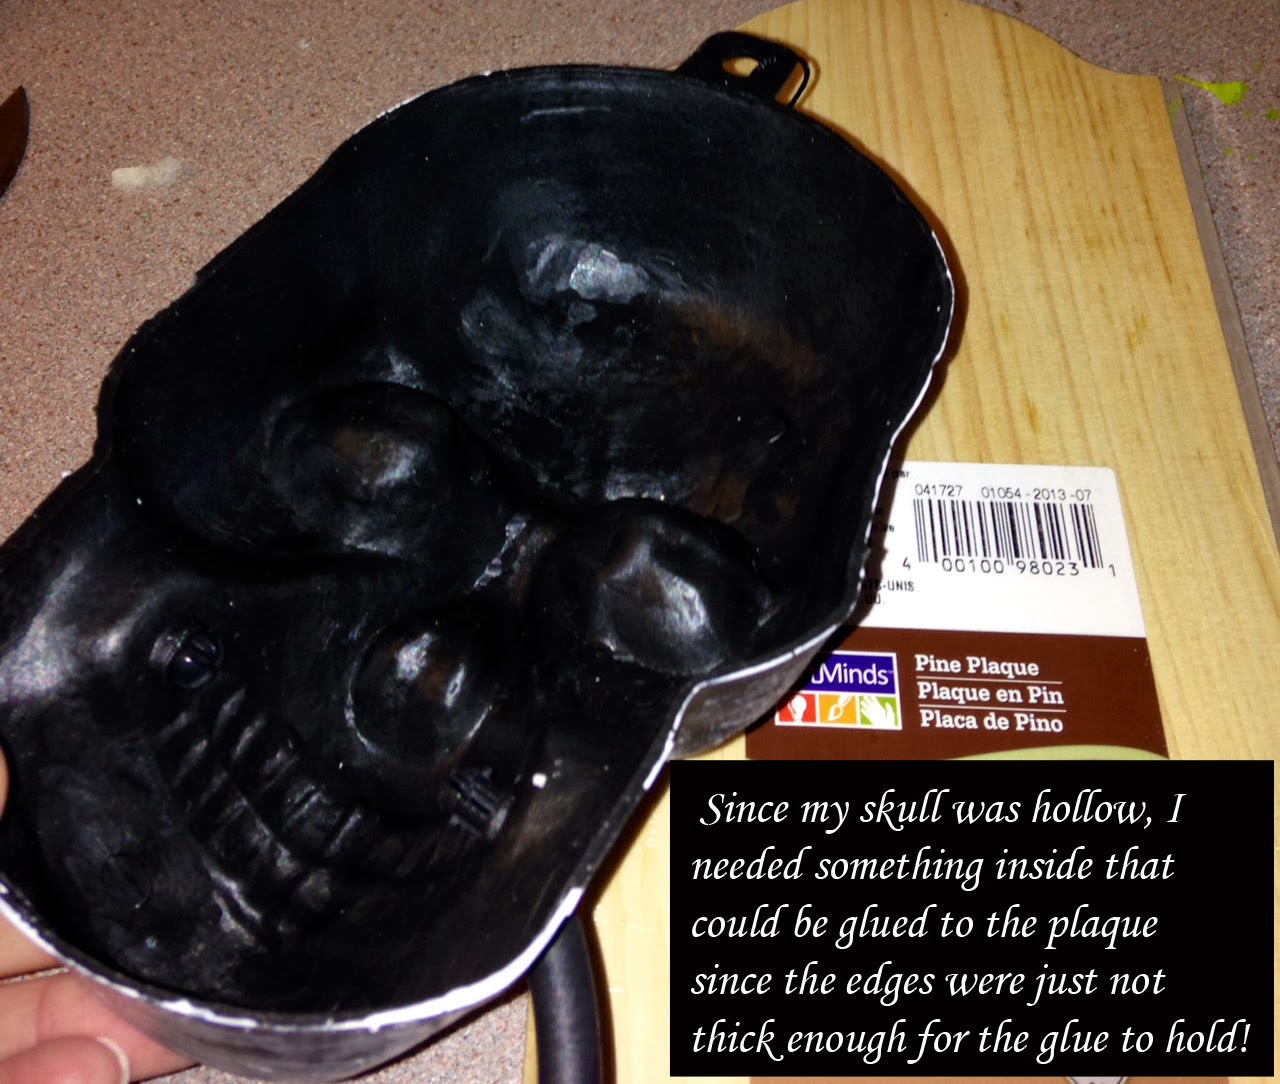
I came across a few pins on Pinterest that had the Door Knocker Skulls from the Dollar Store .....they had added some paint to them, but I wanted to go a little further. I knew I wanted to mount the skull on a plaque, but the plastic lining inside the skull was really thin, so I needed to figure out how to securely glue it to the wood and then dress it up as well.......

The following is a little tutorial on how I whipped up my "Skull Door Knocker" pictured above !!


A wooden plaque...size of your choosing - mine was about 13" in length to have the skull fit evenly in the middle....or thereabouts.

E600 Glue...not pictured...sorry.

Great Stuff - foam spray that is found in the plumbing aisle at the hardware store.

Dollar Store- Skull Door Knocker ...of course!

Silver and Black Spray Paint - pictured below

Silver Embellishments of your choosing.

First, I spray painted my skull and plaque......

While the paint dried, I spray the skull with the Great Stuff Foam.....FYI: a little goes a long way as it expands as it dries.......


Now, the foam needs to dry for the designated time as stated in the instructions on the can.....after it has dried and expanded, it it time to cut your foam to lay even with the edges of the skull...I used a large kitchen knife and found the foam cuts really easily......the foam inside will make it easy to glue the skull to the plaque...

FYI: I was concerned at first that my E6000 would eat away at the foam as it does Styrofoam...but there was no such problem with the Great Stuff Foam...so no worries!!


From here on out....its up to you....Glue your skull where you want it on the wooden plaque and add any embellishments at this point....

Then hang it up and Be Proud!!!!! 

"Knock if you dare......."

I'll be back with one more post of projects before Halloween !!

Till next time,

      Wicked jypsi

Thursday, October 17, 2013

More Halloween Decor: "FrankenDoll Light", "Fortune Teller Sign" and "Wanted: Frankenstein Plaque !!

Only 14 Days til' Halloween....

    We are celebrating like every other crafter, by decorating every nook and cranny of our house with the most exciting craft projects we can create......

Here are my 3 latest projects:


                                  "The Franken-Doll Night Light"


There are quite a few doll-head projects on Pinterest we speak, so when I found an old lamp base at Goodwill, I decided to try my hand at a Frankenstein - themed doll light. I grabbed a doll and "borrowed" her head :), then the green paint, the crackle paste, some wire and bolts from the hardware store and         "Ta Da"...here's what came of it!!


                         "Marie Laveau: Fortune Teller sign"


         I had one heck of a time photographing this sign. I tried outside, inside, etc...and I'm fairly proficient but not a total guru in Photoshop, and there was nothing I knew how to do in that program to help the these pics. Sorry - but it's enough to give you the idea !!


                         "WANTED: Frankenstein Plaque"

     
                    **   This last one was inspired by Dave Lowe, set and prop designer who runs an incredibly cool blog at : Dave Lowe@Blogspot.com  - He made the Frankenstein graphic and text available for download in a pdf on his site - so the above is my version with a plaque I found at a thrift store. I printed out the pdf from Dave's site and resized it, then inked it up a bit and burned the edges to give it an aged look and glued it to the plaque. So take a minute to visit his site - it is really worth the time - you will not leave uninspired...I promise!!

Thanks for stopping by, and I'll be back with a tutorial on the "Skull Door Knocker" project I'm finishing up!!

Till next time,

        Wicked jypsi

Saturday, October 12, 2013

"Zombie Xing" Halloween Sign...

Warning - Warning - ZOMBIES on the loose............


                             "Zombie Xing Sign

I was in Joann's Craft store a few weeks ago and saw a zombie sign there for sale that I thought was pretty neat, but the price tag was not so neat :(  So, I decided to see if I can make my own version ........


I have to say this was a cool little project mostly because of the ease in finding the necessary supplies....


** I found the square plaque at a Goodwill store for a dollar

** I located the exact same images for zombie shadows in the public domain on google images

** I already had the the grey and three yellows I needed to create the texture and background, etc ( lemon yellow, golden yellow and yellow ochre .....did I spell that right?) and the black for the lines and letters.

** And the self-leveling gel I added on top to even it all out after everything was glued painted and had dried.....


Total cost?? (for me, at least, since I already owned the paints) = $ 1.00 :) ....this is probably one of the few times to share with my husband exactly how much I spent on a project!!!


Thanks for stopping by and I'll be back in a day or so with a new Halloween Decoration project to share!!

Till then,

     Wicked jypsi

Sunday, October 6, 2013

Halloween Decor: My Man-Eating Plant

Watch Your Fingers.......

                  It's a  "Man-Eating Plant"


  The season is here and I have been working on so many different projects that my head is spinning a little (but in a Good way)!!  The first one to share is this little plant that grew to be an evil, viscous man-eater after just a little water and sunshine... who knew??

He's become a part of the family of sorts, now that we've had him a while, and you'll find that he's actually very sweet......if you can stand the loss of a chunk of skin here and there- but that only happens if you walk too close. So, keep your distance and everyone's happy!!

I have seen so many of these guys on Pinterest lately when I look up stage props and large-scale Halloween decor that I had to try my own - I'm pretty happy with the results, although I may add one more mouth because there turned out to be more leaves all around then I originally planned and I want the mouth part to stand out, so we'll see...but for now, I'm thrilled.


Thanks for checking this out and I'll be back with lots more!!

Till next time,

       Wicked jypsi